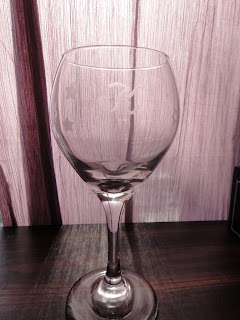
Have you saved up any food jars? Regularly rescue neat glass from second-hand stores? Or maybe you have some boring wine glasses that you'd rather replace with something cuter or fancier? Well, may I suggest instead that you give your glass a second chance by dressing it up with some home-style engraving?
Glass jars sometimes take a good soak in boiling hot water to get the labels off. Glue residue can either be rubbed away or taken off with Goo Gone. (All my jars are currently filled with stuff, ha ha, so I didn't use them for this tutorial.)
Whether you engrave monograms, stars, flowers, or do some free-hand designs, you will give your glassware a new lease on life! All it takes is a steady hand, or a stack of books, a face mask, safety glasses, and a Dremel with some glass engraving tips.
For my demonstration, I just punched out some star shapes with a punch, and used a dab of rubber cement to adhere them to the inside, facing out, so I have a template to follow. I also taped in an initial with clear tape. You can also take designs you've traced onto tracing paper, and tape it inside the glass to use as your template. There are lots of ways to get designs onto your glass before you start. If you use a permanent marker directly onto the glass, all you need is some rubbing alcohol after to clean up the leftover marks. If you don't have tracing paper, open up a clear plastic bag (like a zip lock) or use some other clear cellophane that's easy to work with.
I find that's it's easiest to start by outlining your design, then filling in afterward. You'll feel the edges as a resistance with the tool's tip, and will be better able to stay within the lines. As you're working, you may want to wipe away the glass dust with a damp paper towel, so you can see just how much abrasion you're getting as you work. It might seem like you're done, but then when you wipe away the dust, you'll find that you have a ways to go. Always work from right above your design or template. Because of the thickness of the glass, you can get askew if your angle moves. Keep checking as you work.
When you're done engraving, you can clean up using rubbing alcohol. If the rubber cement doesn't rub out easily, you can also use a bit of WD-40 or Goo Gone to clean it up. In the end, you'll have a lovely and whimsical glass with personality!
I hope you've enjoyed this tutorial on how to engrave glass!
 |
| It's really hard to capture engraved glass! |
Whether you engrave monograms, stars, flowers, or do some free-hand designs, you will give your glassware a new lease on life! All it takes is a steady hand, or a stack of books, a face mask, safety glasses, and a Dremel with some glass engraving tips.
 |
| Like my jeweler's glasses? Ha ha! |
For my demonstration, I just punched out some star shapes with a punch, and used a dab of rubber cement to adhere them to the inside, facing out, so I have a template to follow. I also taped in an initial with clear tape. You can also take designs you've traced onto tracing paper, and tape it inside the glass to use as your template. There are lots of ways to get designs onto your glass before you start. If you use a permanent marker directly onto the glass, all you need is some rubbing alcohol after to clean up the leftover marks. If you don't have tracing paper, open up a clear plastic bag (like a zip lock) or use some other clear cellophane that's easy to work with.
 |
| Punch with dark paper, for contrast |
 |
| Glue shapes to inside of glass, facing outward |
I find that's it's easiest to start by outlining your design, then filling in afterward. You'll feel the edges as a resistance with the tool's tip, and will be better able to stay within the lines. As you're working, you may want to wipe away the glass dust with a damp paper towel, so you can see just how much abrasion you're getting as you work. It might seem like you're done, but then when you wipe away the dust, you'll find that you have a ways to go. Always work from right above your design or template. Because of the thickness of the glass, you can get askew if your angle moves. Keep checking as you work.
 |
| Check your work by wiping away dust every now and then |
 |
| Initial traced onto clear plastic, and taped to inside of glass |
I hope you've enjoyed this tutorial on how to engrave glass!


2 comments:
Beautiful work Shari! I think I would break a lot of glass if I tried this or some rather interesting engravings lol. I love the stars :0)
Ha ha, well, Shell... my engraving wasn't perfect. But to me, that's what makes it cool and special! I have been waiting forever for the charger to finish so I can work on my other glass for a set of two. If it turns out, I will post it, too!
Thank you!
Post a Comment