Showing posts with label reusing. Show all posts

Wednesday, September 21, 2011

Reclaimed Table Project Update

So I had the day off Monday, so after running my errands, I worked on my upcycled table. Remember how we'd turned an old solid wood door into a table for our porch? Well, it's been sitting on my porch, and I've been wanting to do some more work on it. I sanded and sanded (by hand) and then I got out the tin of Butcher's Wax to give it a good seal.
     "Wax on. Wax off. Very good, Daniel-san," 
     "Thanks, Mr. Miyagi. I couldn't have done it without you."
I only got the top done, along with the front edges of the base... 


I know it doesn't look that much better, but believe me, it is! The color deepened to a warm brown, which I am really liking. The feel is so smooth now, and it's got protection against the weather. Lucky thing, too... I woke up this morning to the sound of rain. It was so sunny and beautiful yesterday! I wish I had finished the entire table while it was still nice out, but my arms and back are saying, "Glad you stopped when you did!" Yeah, I'm a bundle of sore muscles... but as I also have today off, I can relax. Today my plan is to start packing for my trip... I leave on Saturday! Eeek! And to also get another blog post ready for y'all. I went on a very interesting nature walk yesterday, too, after K got home, and want to share those pictures with you, as well.

Friday, September 16, 2011

Reuse Your Man's Shirt with Fabulous Designs!

Check this out!


I just wish I were this skinny so that I could do these awesome looking re-vamps of K's shirts. Maybe a trip to the second-hand store is in order... I can find a 3X striped men's shirt and do this, I think...

Wednesday, March 23, 2011

Reuse ~ Repurpose: Guest Project

Check out this awesome project that my friend Rebekkah posted on her blog.... Life is Happy Most of the Time... You can do this with an old jersey knit t-shirt that maybe you were going to toss because it had a little hole or something. A beautiful repurposing idea, isn't it? Is that the right word? I don't know... since you're still wearing it, just not as a shirt. 

Photo by Rebekkah Drake
Check out her blog for the how-to on this cool project! She's such a clever gal!! She's a very good photographer, also... take a peek at some of her old posts when you have some time, you'll be glad you did!

Wednesday, February 23, 2011

Reuse ~ Repurpose: Week 8

Whenever I get a bag of small potatoes, or bag of lemons, and I see the plastic mesh it comes in, I think, "Oooh, what a great texture!" I save these bags, as well as any kind of porous packaging that might make a good background on a journal page, art card or something else you want to layer up.
Netting from fruit bags (red) and old acrylic wash cloth (pink)

 Whether you use the negative space of the texture, which isn't the easiest, or the surface texture, which is easier, you get an interesting layer to your work. In these pictures, I've just used some acrylic to show you what the textures can look like, although these aren't very artfully done. I just used a roller and on one, tried to get the background texture to show, and on the other, rolled the paint onto the texture, then flipped it and pressed the painted surface onto the paper.

Using the negative space of one fruit bag


Using the positive space of the other fruit bag


Using positive space of the wash cloth


Try different things with textures! I'm definitely going to. I have only ever saved these bags and never used them. This is my first time, too! You can wash these and reuse them many times.

The other use for them is as dish scrubbies! They won't scratch your pans, and they're just like the ones that you'd buy from the store, only you already have them! Just gather them up and use a strong rubber band to hold it into a scrunchy shape. The rubber band will deteriorate over time, but you can replace it. Also, it's easier to clean these out after you use them to clean up your plates, etc. 

I hope this keeps a few more things out of your trash bin!! :-) 

Wednesday, February 16, 2011

Reuse ~ Repurpose: Week 7

Today's subject for reusing or repurposing is the old tea cup. I just luuuuv old tea cups! I have several stashed away in California that I didn't bring with me because of their delicate nature. I love using them for drinking out of, but after a few too many fixed cracks, there comes a time when some must be retired. So what about these ideas?


Image from thepeartree
At thepeartree, you can find a "how to" for making this lovely candle in a tea cup. A few of these on your table would make the perfect setting for a girlie get-together!


Image from HGTV
Alternately, you could put sweet little plants in your tea cups, like they show at Elizabethannedesigns. And if your tea cups and saucers are abundant, and no longer that usable, you could tackle a really cool project like a mosaic backsplash in  your kitchen! HGTV shows you how, here. I wanted to have my own examples for you, but strangely, the people in this town don't give up their teacups easily! I've been to a few second-hand stores, and haven't found many cool tea cups. I prefer the older, delicate and sweet tea cups, which remind me of a gentler age. 


Another cool idea is to turn the cup into a nightlight. On Etsy, Micah7 has some lovely ones!


You can find this violet light in Micah7's shop
Another lovely lighting idea found on SevenEight is this tea cup chandelier. You know how I love interesting lighting? Well this is really cool...

Made by Domestic Construction

However you choose to use your tea cups, old or new, don't they just remind you of simpler times? An age when people actually visited each other just to have tea together... when the lady of the house would get out her fine china, brew some delicious tea, make a few pastries or run out to the bakery for some, and set some flowers on the table, just for a visit with her friends. Very gracious and very welcoming. I love the sentiment that our friends are worth the time and effort. I don't think that we should let that go in these more modern and fast-paced times, do you?


What kinds of things do you do for your friends when they visit?

Wednesday, February 9, 2011

Reuse ~ Repurpose: Week 6

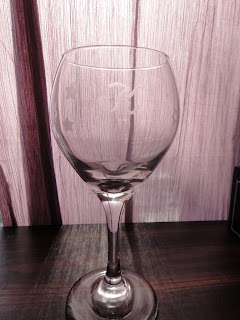
Have you saved up any food jars? Regularly rescue neat glass from second-hand stores? Or maybe you have some boring wine glasses that you'd rather replace with something cuter or fancier? Well, may I suggest instead that you give your glass a second chance by dressing it up with some home-style engraving?

It's really hard to capture engraved glass!
 Glass jars sometimes take a good soak in boiling hot water to get the labels off. Glue residue can either be rubbed away or taken off with Goo Gone. (All my jars are currently filled with stuff, ha ha, so I didn't use them for this tutorial.)

Whether you engrave monograms, stars, flowers, or do some free-hand designs, you will give your glassware a new lease on life! All it takes is a steady hand, or a stack of books, a face mask, safety glasses, and a Dremel with some glass engraving tips.


Like my jeweler's glasses? Ha ha!

For my demonstration, I just punched out some star shapes with a punch, and used a dab of rubber cement to adhere them to the inside, facing out, so I have a template to follow. I also taped in an initial with clear tape. You can also take designs you've traced onto tracing paper, and tape it inside the glass to use as your template. There are lots of ways to get designs onto your glass before you start. If you use a permanent marker directly onto the glass, all you need is some rubbing alcohol after to clean up the leftover marks. If you don't have tracing paper, open up a clear plastic bag (like a zip lock) or use some other clear cellophane that's easy to work with.

Punch with dark paper, for contrast


Glue shapes to inside of glass, facing outward


I find that's it's easiest to start by outlining your design, then filling in afterward. You'll feel the edges as a resistance with the tool's tip, and will be better able to stay within the lines. As you're working, you may want to wipe away the glass dust with a damp paper towel, so you can see just how much abrasion you're getting as you work. It might seem like you're done, but then when you wipe away the dust, you'll find that you have a ways to go. Always work from right above your design or template. Because of the thickness of the glass, you can get askew if your angle moves. Keep checking as you work.

Check your work by wiping away dust every now and then

Initial traced onto clear plastic, and taped to inside of glass
 When you're done engraving, you can clean up using rubbing alcohol. If the rubber cement doesn't rub out easily, you can also use a bit of WD-40 or Goo Gone to clean it up. In the end, you'll have a lovely and whimsical glass with personality!

 I hope you've enjoyed this tutorial on how to engrave glass!

Thursday, February 3, 2011

Reuse ~ Repurpose: Week 5

Finished Chandy for the bare bulb
This week's reuse/repurpose idea is a Found Glass & Crystal Chandelier. Do you have any bare bulb lamps in your home? I have this one in the hallway that we could never find the right sized cover for, as it's quite an old fixture, and we didn't want to do a completely new re-wiring job on it. I've wanted to do something interesting with it since moving in!

So... I had collected a bunch of heavy pieces of glass from the river that runs through town, over summer. I wasn't sure how I was going to use it, but I felt like it was a good thing, as I was picking up this junk out of the riverbanks, where it was possible that people or animals could get hurt. The interesting aspect of the glass was that the pieces were obviously very old, and some had become iridescent with a mineral patina. Also, you could make out words or letters on some of the bits, and with the odd shaped facets on some, well, I knew I'd figure out some way of using them!

To start, you need some wire, both for the base of the structure, and also to string together your glass. I used craft wire for the base, which I think is around 14 gauge.

I created this using the diameter of the throat of the bare bulb.
 Then you need the wire for stringing, and I used a 24 gauge craft wire, though I had all kinds of lighter gauge copper wire. The lighter gauge will be good for a lot of projects, but I felt the heavier, yet pliable, 24 gauge was perfect.

 I started by cutting a piece of the heavy gauge craft wire and making a sort of bracelet to go around the base of the bare bulb fixture that I wanted to make the chandelier for. Then I created the hook and loop using a pair of pliers.
 Next, I cut a length of the 24 ga. wire, and started to wrap a piece of the glass that I had gathered for the project. Be careful of your fingers, as this type of glass has sharp edges. However, if you use beach glass, you won't have to worry! I also used some crystal drops that I had found at yard sales and vintage stores throughout the years, to add some more standard-looking appeal to the piece.

Found glass bits & pieces

Starting a section of the drops

Wind however it feels best
 I made sure that each piece of glass was securely fastened by winding the wire around in different directions. I added curls of wire, here and there, where I wanted some more whimsy.


 I made about five or six drops that I hung from the supporting bracelet piece, and hung them on, spacing them around equally. At this point, the top looked a bit bare, so I made some strings of beads, glass, faceted crystals to loop fancifully around the top until it was as full looking as I wanted.

The nice thing about making your own "chandelier" to cover a bulb is that you can go as crazy as you want. Be sure to use materials that are safe getting heated next to a bulb. The bulbs I have are all eco-bulbs, and low-wattage, but you still need to consider this. Safety first!! I hope you've enjoyed this little project, and consider saving broken cut-glass bowls (safely) for goofy projects like this one! You could also just make a glass mobile or light-catcher for your backyard or anywhere you want to add some glittery, sparkly whimsy!

Wednesday, January 26, 2011

Reuse ~ Repurpose: Week 4

Pattern for this I found online
  
It's a Paper Flower Bonanza! Yes, I went crazy with flower-making... same weekend as the wax hearts, actually! (The living room was a complete disaster! Ha ha!)

Where buttons were too small, I backed them with large sequins

I added feather ribbon to the center of some

My boyfriend taught me how to make these!

I made several different designs

Found this style online

All four types of paper flowers I made
In this week's Reuse ~ Repurpose, I have reused scraps from my book-making papers, which I keep in a box. They're usually of varying widths and heights, so this kind of project was perfect for them! I also used an old catalog that I had received in the mail. And I also used paper that was saved from the last time I purchased some breakables, and the store wrapped them in butcher paper. All the paper here was gathered from places all over my craft room, and none of it was purchased specifically for this project.

For the top flower, I used six segments, rather than the five shown in the kusudama tutorial. And for some of these flowers, I added the glittery stamen using feather ribbon that I had from Michael's, bought a while back for wrapping gifts and possible crafting. I found this online tutorial that's really simple!

For the purple fan-like flower, I folded four pieces of paper using a fan fold. Then I folded those each in half, length-wise. The four segments will then be one quarter of the flower, and you can just glue them together, or use tape if you haven't any glue. The instructions for this were in French, in an old edition of Marie Claire Idées, so I can't reprint it for you, but it's easy.

The button flowers are made using strips of paper, looped around in a circle, and then pressed down in the center so that the middle of the circle and the two ends come down on top of each other. I punched a small hole through all three papers and strung them using waxed thread (though you can use any kind of heavier-type thread and even pipe-cleaners, if you have some) using the button at the top to hold it all together. Then each additional strip is looped, hole-punched, then strung under the last. If you would like a tutorial on this, let me know!

Due to a Firefox freeze-up, I lost the link for the recycled catalog flowers/rosettes tutorial, but they are simple to make: cut through a catalog, making sure that you include the part of the spine that has a staple in it. You want about 2-3" in width, all the way across the top or bottom of a catalog that has at least 30 pages. Mine had about 60 pages. After you've cut a sort of mini-catalog, you're going to take one of the center pages, add some glue (I used a glue stick) to the bottom of the strip you're holding, and adhere it to itself at the crease. You continue in this fashion until it's all looped & glued. Then you flip it over and finish the other half. Once complete, if you used a smaller catalog, you'll want to do another and then glue the two halves together. If you used a larger one, like I did, then you're done! (If this isn't clear, I'd be happy to do a tutorial, just let me know. I looked and looked online, and in my history and couldn't find the link for you. I apologize.)

I haven't yet actually strung them together in a permanent way. I'm not sure how I want to do it yet. When I figure it out, I'll post the photo for you!

Thursday, January 20, 2011

Reuse ~ Repurpose: Week 3


Doesn't this look like a planet?


As you may or may not know, my boyfriend is a grade school teacher. One day, he came home with a big bag of over-used and/or broken crayons. He asked me if I could think of anything to do with these, and of course, I said "Yes!"

One of my favorite things to do as a child was to grind up my crayons that were too short for the box, or duplicates of other colors I had newer versions of, and I pile up the shavings into a Tupperware. I would then make glue & crayon shaving drawings with them until my mom got mad at me for the mess I was making in my room.

Those drawings didn't hold up well with time, but I learned another fun project that you can use crayon shavings to do, and I learned it from Martha Stewart, who had probably learned it from someone else.... as I remember doing this project in school art class, years ago.

I love the stained glass look of the hearts and circles. Some of the circles actually resemble planets like Jupiter, with it's colorful gassy composition.

To make the hearts/shapes, all you need is crayons shaved into piles, waxed paper, kraft paper/layers of newspaper, and an iron. I also punched little holes into the shapes after I cut them, and strung them together with embroidery thread. The circles were glued in place, one on each side of the thread. Less crayon shavings make more translucent "stained glass" and heavier crayon shavings gives you denser, richer looking "stained glass".

It's such a fun project to do on a cold, wintry day. Although, make sure your cats are asleep when you start to string the pieces into garlands! Otherwise, it could get a little more like a game of tug-o-war!  

Friday, January 14, 2011

More Ideas for At-Home Book-Making

It occurred to me that when I did the tutorial about making books out of boxes, that I didn't really mention too much about the TYPES of boxes you can use. You're only limited by what you have in your home, which is not as limited as you might think!


You can seek out... match boxes, pasta boxes, perfume boxes... pretty much anything that's made out of cardboard! Look for pretty colors or fun words.


Box from hair product I purchased

I decoupaged the inside covers
I just used linen tape on the spine
Cover from a sample of perfume that I thought was pretty

The back I covered in a scrap of marbled paper
Also made a business card book (rear), and a matchbox book (front).
So you see, you can pretty much use anything you like to make a cool little book! I especially enjoy making miniature books because they are so quick and easy to make. They make cute little gifts, or as notebooks to keep in your purse or car.


I hope you have fun finding new little boxes to make into fun, usable books! Don't toss out those boxes into the recycle bin just yet!
Related Posts Plugin for WordPress, Blogger...