Showing posts with label paper arts. Show all posts

Friday, August 26, 2011

Happy Birthday to My Sweetie! (And Virgos Everywhere!)

Keith's birthday is today, and I made a special "banner" for him. When he woke up this morning, it was sitting out for him on his desk...


I painted some watercolor paper, made a heart template, traced the hearts out... one for each letter. I partially cut them out with an X-acto knife, not all the way through, but enough so I could see where the outline of the heart was on the other side, too. Then I used ink and a calligraphy pen to write out the letters on both sides of the hearts. After it was all dry, I cut them out and punched small holes in the top of each one.


I used baker's twine to tie them onto the branch that I put into a tall, straight glass vase filled with marbles. I also made a little owl to sit on the opposite branch.


I hope he likes the beginning of his birthday! Today I'm making him his favorite pie (lemon meringue) that we're going to have after dinner at our favorite restaurant, Apollo Grill. Last year, he only shared that pie with me. Ha ha. He's very protective of that lemon meringue pie! Probably because he only gets to have it on his birthday!! 


I hope that he feels super special on his birthday... he deserves it. He makes me feel super special every day of my life. xox

Monday, March 14, 2011

Map Bag Tutorial

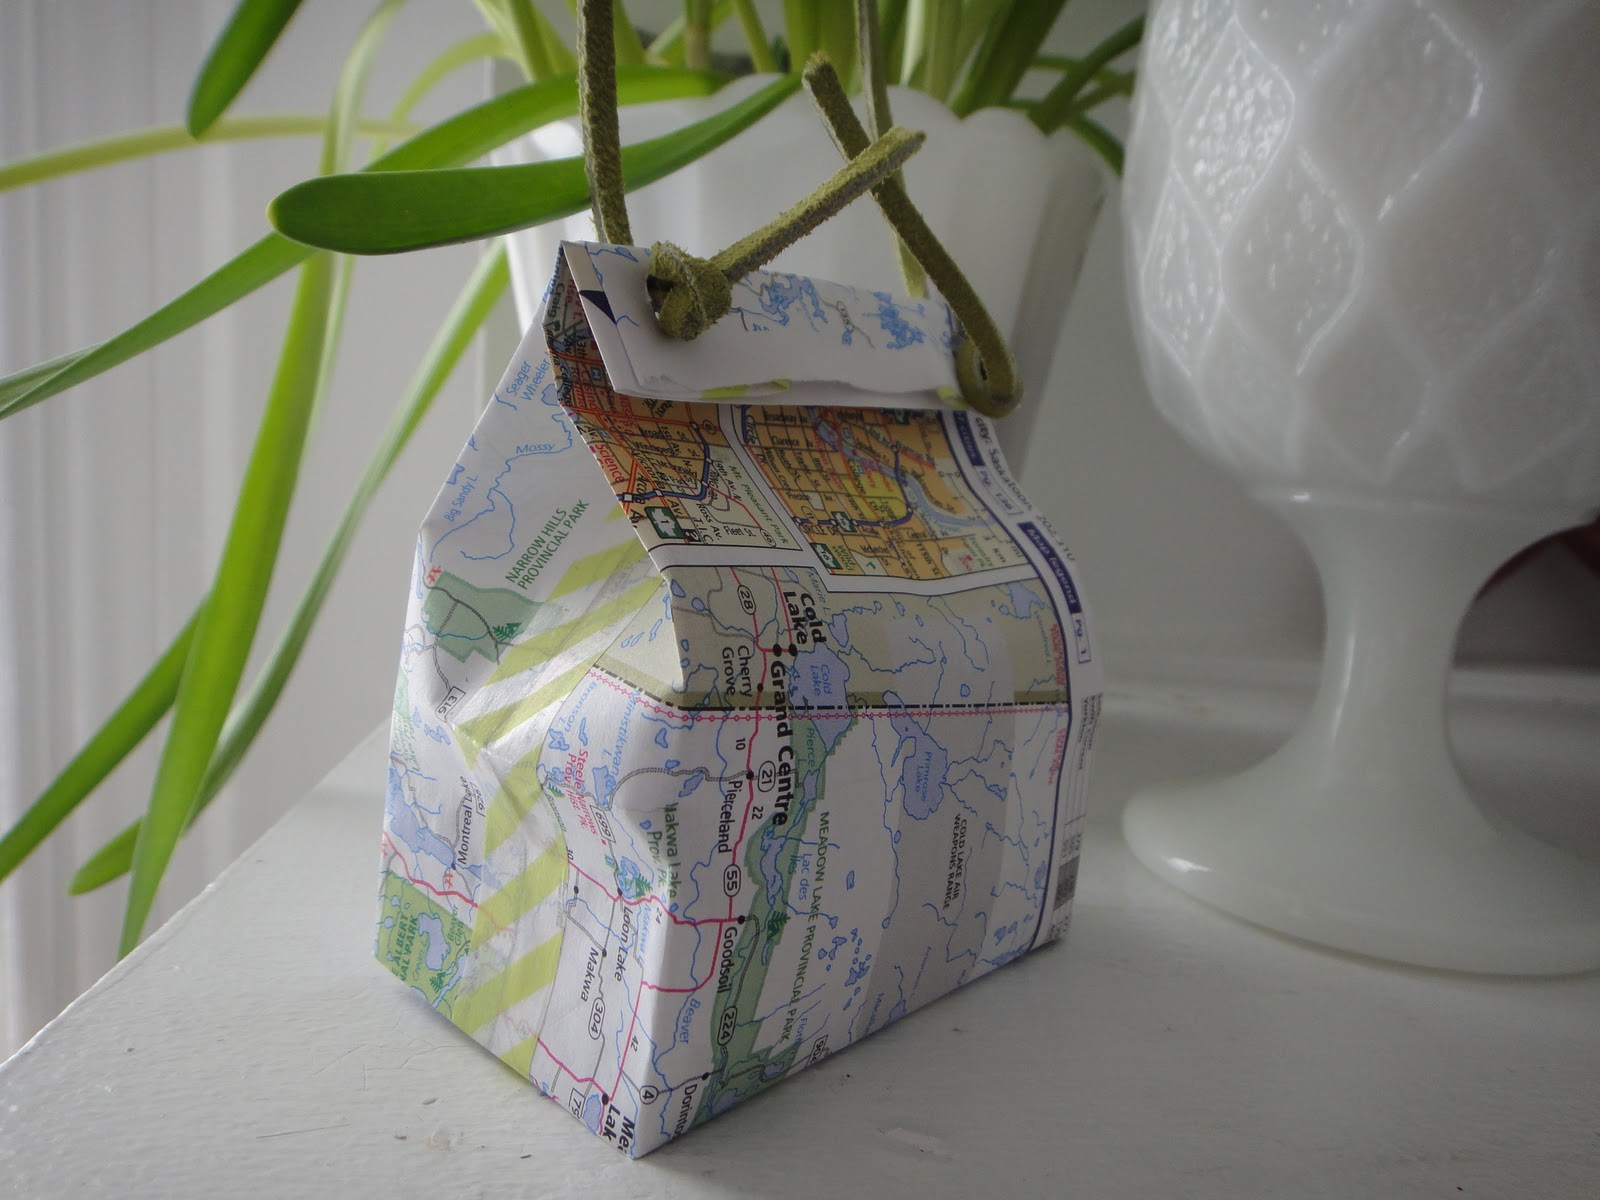
Hello My Friends, at the request of a few readers, I have put together this tutorial for my Map Bag, from last week's Reuse ~ Repurpose post.
Start with a map, obviously, and decide how big you want it. Just a rough idea is needed, and I figure it out by bending the paper around until I see the height I'm looking for... then cut the paper down.
This sheet, folded up on both sides, with a bottom, is about what I want.
Then fold the sheet in half, cross-wise, giving you a center for the bottom of your bag.
Then fold up from that center-fold, which will be one-half of your bag's base. Then fold the same fold in the other direction, so that when you open up your folds, they will be able to bend straight up, like this:
The folding creates your base
One inch is approx. over a half of the width
I then draw lines down the inside of the folds so that I can see them easily, and I measure the width of the base. You will need to know what one-half of that dimension is so that you can mark a spot that is just over one-half of your base's width.
I mark 1inch from each side, on both of the outer folds
You are going to cut towards the edge, starting from that 1" mark that you made on each end of the bag lines, as shown above.
Use a straight-edge of some kind to steady your hand
This will help to create the sides of your bag...
Fold all the tabs, so you have easy guidelines for gluing
After you cut those one inch lines out towards the edge, you will have tabs for folding. Then put some PVA (poly vinyl acetate) or other paper glue onto just the outside of the small tabs, like this:


Then bring up one side first, overlapping that small tab with the glue on it. Press together, and bring up the other side, and then lay them flat. You can use a ruler/scale to help you press down inside the bag like this:
Now do the other side in the same way, using the ruler to help press down the paper to the glue. You're almost done!
Now you want to find some tape to use along the sides. You can glue the side tabs, if you want to, or just use the tape, as I did. Measure the height of your bag, and then cut the tape a little long to fold over the top and bottom of the bag.


You're so close to finished now! If you're filling with candy, or a gift, now's the time to put it into the bag. Next we need to close it... Fold over the top of the bag, giving yourself enough space to punch a hole.

You didn't think J Boo wasn't around, did you?
I like to use a leather lace, because I think it looks good with the map, but you can use anything... ribbon, ties, string, whatever floats your boat! I tried to keep the strap long enough for putting over a doorknob, as that was it's purpose for me. You can make the strap to suit your fancy.
Whoever it's for is sure to love it! And once you've done it the first time, it gets way easier, and you can modify the design to your heart's content!


I hope you enjoyed this tutorial! Now go out there and make a map bag! xoxo

Thursday, March 10, 2011

Reuse ~ Repurpose: Week 9

Okay, I know it's actually Thursday, but I'm all out of whack, blog-wise. So much school work, both on the BYW course and my writing class! I do it to myself, I know. But as I AM paying for this learning, I am also throwing myself in, clothes and all!


I made this, and wanted to share. It's a map bag, and it's filled with candy! It's strong enough to be hung from a door knob, which is how I designed it.


Front
Back
If you would like to know how, I can put together a little tutorial, but it's really easy! And I was thrilled to be able to use my craft tape along the sides. (It's diagonal green stripes, see it?) The recipient of this bag liked it a lot. :-) I mean, come on, it's filled with Reese's Peanut Butter Cups in Easter colors! Who wouldn't like it?


Tuesday, March 8, 2011

Handmade Birthday


Today is my boyfriend's brother, Kyle's, birthday. Since moving to PA, he's become one of my good friends. I thought I'd try to give him a different kind of birthday than he's used to, being a BMX biker, and outdoorsy guy. When he gets home, the banner above will be on his door. He was bummed that he had class after work today, so this might at least bring a smile to his face before he goes off to school!


I also made him a beer box book, as he'd admired the one that I made my boyfriend. (You may have seen the mini-tutorial I did of it?) If not, you can check it out here. He actually has tried to take it home several times. ;-)


For this book, to make it special for his birthday, I chose the beer box with the bike in it. He loves to make his own bikes, and this artist is also one that he admires. It was a no-brainer! I also painted the pages... and had a little help, as usual.


I wanted to point out that Beckham helped in the painting of these pages by jumping up when it was still wet, and getting prints all over it. There are others throughout the book!


There are lots of signatures (eight) in this book, so plenty of pages. It could be used as a photo album, journal, drawing book... anything you'd use a blank book for. The pages are actually heavy Arches watercolor paper, so they're very rigid. As it's not exactly blank, the pages may feel less daunting to draw in. That's my hope, anyway!


I hope he enjoys his birthday! He's helped to make my transition from California to Pennsylvania a lot easier. Just having another friend always helps! 

Friday, February 11, 2011

Easy Valentine's Day Card Tutorial

Here's a simple card you can make for your special person on Valentine's Day. It's up to you what you want to put on it, but I'll give you the basics!


Fold over, then lift top back to work on bottom of card


Start with a long piece of heavy paper, like watercolor paper or cardstock. Fold to about an inch in front of the bottom edge.

Use gridline to help with where to end cuts

Heart should stop be just below the gridline

Line up the top edge with a gridline, so you can see where the edge would lay, then lift the top sheet away and with an X-acto knife, cut out a heart shape until it reaches just past the line. Do not finish the bottom of the heart, though, or you will cut out the heart from the paper. You don't want to do that for this card.


Note that hearts are still connected to the paper


Next, line up a clear scale or piece of paper, so you can see where you should cut your next heart shape out. They hearts will be connected and hold the front of the card down. Next, using either watercolors, color pencils, pens, or whatever you prefer, color the hearts, finishing the bottom of the shape with the color. I like to put a piece of scratch paper behind the heart as I work, so that I don't accidentally color onto the background.

Finish heart shape using color

Scratch paper behind the hearts help
I like to do a warm wash of color inside with watercolors, but you can alternately leave it plain, use another craft paper inside, or do whatever makes you happy.

I make a warm wash of color inside, then I'll write a sweet sentiment or poem


Then I like to decorate the front with more watercolor hearts. You could adhere a photo, or anything you like, really. I just like to keep it simple! I hope you like this little tutorial on making a simple, but fun, Valentine's Day card!

Happy Valentine's Day to all you lovely people! Celebrate Love this weekend! xoxo 

Wednesday, January 26, 2011

Reuse ~ Repurpose: Week 4

Pattern for this I found online
  
It's a Paper Flower Bonanza! Yes, I went crazy with flower-making... same weekend as the wax hearts, actually! (The living room was a complete disaster! Ha ha!)

Where buttons were too small, I backed them with large sequins

I added feather ribbon to the center of some

My boyfriend taught me how to make these!

I made several different designs

Found this style online

All four types of paper flowers I made
In this week's Reuse ~ Repurpose, I have reused scraps from my book-making papers, which I keep in a box. They're usually of varying widths and heights, so this kind of project was perfect for them! I also used an old catalog that I had received in the mail. And I also used paper that was saved from the last time I purchased some breakables, and the store wrapped them in butcher paper. All the paper here was gathered from places all over my craft room, and none of it was purchased specifically for this project.

For the top flower, I used six segments, rather than the five shown in the kusudama tutorial. And for some of these flowers, I added the glittery stamen using feather ribbon that I had from Michael's, bought a while back for wrapping gifts and possible crafting. I found this online tutorial that's really simple!

For the purple fan-like flower, I folded four pieces of paper using a fan fold. Then I folded those each in half, length-wise. The four segments will then be one quarter of the flower, and you can just glue them together, or use tape if you haven't any glue. The instructions for this were in French, in an old edition of Marie Claire Idées, so I can't reprint it for you, but it's easy.

The button flowers are made using strips of paper, looped around in a circle, and then pressed down in the center so that the middle of the circle and the two ends come down on top of each other. I punched a small hole through all three papers and strung them using waxed thread (though you can use any kind of heavier-type thread and even pipe-cleaners, if you have some) using the button at the top to hold it all together. Then each additional strip is looped, hole-punched, then strung under the last. If you would like a tutorial on this, let me know!

Due to a Firefox freeze-up, I lost the link for the recycled catalog flowers/rosettes tutorial, but they are simple to make: cut through a catalog, making sure that you include the part of the spine that has a staple in it. You want about 2-3" in width, all the way across the top or bottom of a catalog that has at least 30 pages. Mine had about 60 pages. After you've cut a sort of mini-catalog, you're going to take one of the center pages, add some glue (I used a glue stick) to the bottom of the strip you're holding, and adhere it to itself at the crease. You continue in this fashion until it's all looped & glued. Then you flip it over and finish the other half. Once complete, if you used a smaller catalog, you'll want to do another and then glue the two halves together. If you used a larger one, like I did, then you're done! (If this isn't clear, I'd be happy to do a tutorial, just let me know. I looked and looked online, and in my history and couldn't find the link for you. I apologize.)

I haven't yet actually strung them together in a permanent way. I'm not sure how I want to do it yet. When I figure it out, I'll post the photo for you!

Thursday, January 20, 2011

Reuse ~ Repurpose: Week 3


Doesn't this look like a planet?


As you may or may not know, my boyfriend is a grade school teacher. One day, he came home with a big bag of over-used and/or broken crayons. He asked me if I could think of anything to do with these, and of course, I said "Yes!"

One of my favorite things to do as a child was to grind up my crayons that were too short for the box, or duplicates of other colors I had newer versions of, and I pile up the shavings into a Tupperware. I would then make glue & crayon shaving drawings with them until my mom got mad at me for the mess I was making in my room.

Those drawings didn't hold up well with time, but I learned another fun project that you can use crayon shavings to do, and I learned it from Martha Stewart, who had probably learned it from someone else.... as I remember doing this project in school art class, years ago.

I love the stained glass look of the hearts and circles. Some of the circles actually resemble planets like Jupiter, with it's colorful gassy composition.

To make the hearts/shapes, all you need is crayons shaved into piles, waxed paper, kraft paper/layers of newspaper, and an iron. I also punched little holes into the shapes after I cut them, and strung them together with embroidery thread. The circles were glued in place, one on each side of the thread. Less crayon shavings make more translucent "stained glass" and heavier crayon shavings gives you denser, richer looking "stained glass".

It's such a fun project to do on a cold, wintry day. Although, make sure your cats are asleep when you start to string the pieces into garlands! Otherwise, it could get a little more like a game of tug-o-war!  
Related Posts Plugin for WordPress, Blogger...