Showing posts with label tutorial. Show all posts

Monday, March 14, 2011

Map Bag Tutorial

Hello My Friends, at the request of a few readers, I have put together this tutorial for my Map Bag, from last week's Reuse ~ Repurpose post.
Start with a map, obviously, and decide how big you want it. Just a rough idea is needed, and I figure it out by bending the paper around until I see the height I'm looking for... then cut the paper down.
This sheet, folded up on both sides, with a bottom, is about what I want.
Then fold the sheet in half, cross-wise, giving you a center for the bottom of your bag.
Then fold up from that center-fold, which will be one-half of your bag's base. Then fold the same fold in the other direction, so that when you open up your folds, they will be able to bend straight up, like this:
The folding creates your base
One inch is approx. over a half of the width
I then draw lines down the inside of the folds so that I can see them easily, and I measure the width of the base. You will need to know what one-half of that dimension is so that you can mark a spot that is just over one-half of your base's width.
I mark 1inch from each side, on both of the outer folds
You are going to cut towards the edge, starting from that 1" mark that you made on each end of the bag lines, as shown above.
Use a straight-edge of some kind to steady your hand
This will help to create the sides of your bag...
Fold all the tabs, so you have easy guidelines for gluing
After you cut those one inch lines out towards the edge, you will have tabs for folding. Then put some PVA (poly vinyl acetate) or other paper glue onto just the outside of the small tabs, like this:


Then bring up one side first, overlapping that small tab with the glue on it. Press together, and bring up the other side, and then lay them flat. You can use a ruler/scale to help you press down inside the bag like this:
Now do the other side in the same way, using the ruler to help press down the paper to the glue. You're almost done!
Now you want to find some tape to use along the sides. You can glue the side tabs, if you want to, or just use the tape, as I did. Measure the height of your bag, and then cut the tape a little long to fold over the top and bottom of the bag.


You're so close to finished now! If you're filling with candy, or a gift, now's the time to put it into the bag. Next we need to close it... Fold over the top of the bag, giving yourself enough space to punch a hole.

You didn't think J Boo wasn't around, did you?
I like to use a leather lace, because I think it looks good with the map, but you can use anything... ribbon, ties, string, whatever floats your boat! I tried to keep the strap long enough for putting over a doorknob, as that was it's purpose for me. You can make the strap to suit your fancy.
Whoever it's for is sure to love it! And once you've done it the first time, it gets way easier, and you can modify the design to your heart's content!


I hope you enjoyed this tutorial! Now go out there and make a map bag! xoxo

Friday, February 11, 2011

Easy Valentine's Day Card Tutorial

Here's a simple card you can make for your special person on Valentine's Day. It's up to you what you want to put on it, but I'll give you the basics!


Fold over, then lift top back to work on bottom of card


Start with a long piece of heavy paper, like watercolor paper or cardstock. Fold to about an inch in front of the bottom edge.

Use gridline to help with where to end cuts

Heart should stop be just below the gridline

Line up the top edge with a gridline, so you can see where the edge would lay, then lift the top sheet away and with an X-acto knife, cut out a heart shape until it reaches just past the line. Do not finish the bottom of the heart, though, or you will cut out the heart from the paper. You don't want to do that for this card.


Note that hearts are still connected to the paper


Next, line up a clear scale or piece of paper, so you can see where you should cut your next heart shape out. They hearts will be connected and hold the front of the card down. Next, using either watercolors, color pencils, pens, or whatever you prefer, color the hearts, finishing the bottom of the shape with the color. I like to put a piece of scratch paper behind the heart as I work, so that I don't accidentally color onto the background.

Finish heart shape using color

Scratch paper behind the hearts help
I like to do a warm wash of color inside with watercolors, but you can alternately leave it plain, use another craft paper inside, or do whatever makes you happy.

I make a warm wash of color inside, then I'll write a sweet sentiment or poem


Then I like to decorate the front with more watercolor hearts. You could adhere a photo, or anything you like, really. I just like to keep it simple! I hope you like this little tutorial on making a simple, but fun, Valentine's Day card!

Happy Valentine's Day to all you lovely people! Celebrate Love this weekend! xoxo 

Wednesday, February 9, 2011

Reuse ~ Repurpose: Week 6

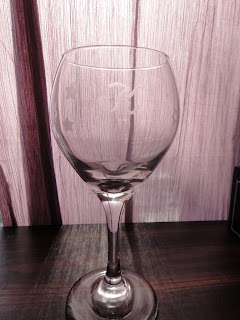
Have you saved up any food jars? Regularly rescue neat glass from second-hand stores? Or maybe you have some boring wine glasses that you'd rather replace with something cuter or fancier? Well, may I suggest instead that you give your glass a second chance by dressing it up with some home-style engraving?

It's really hard to capture engraved glass!
 Glass jars sometimes take a good soak in boiling hot water to get the labels off. Glue residue can either be rubbed away or taken off with Goo Gone. (All my jars are currently filled with stuff, ha ha, so I didn't use them for this tutorial.)

Whether you engrave monograms, stars, flowers, or do some free-hand designs, you will give your glassware a new lease on life! All it takes is a steady hand, or a stack of books, a face mask, safety glasses, and a Dremel with some glass engraving tips.


Like my jeweler's glasses? Ha ha!

For my demonstration, I just punched out some star shapes with a punch, and used a dab of rubber cement to adhere them to the inside, facing out, so I have a template to follow. I also taped in an initial with clear tape. You can also take designs you've traced onto tracing paper, and tape it inside the glass to use as your template. There are lots of ways to get designs onto your glass before you start. If you use a permanent marker directly onto the glass, all you need is some rubbing alcohol after to clean up the leftover marks. If you don't have tracing paper, open up a clear plastic bag (like a zip lock) or use some other clear cellophane that's easy to work with.

Punch with dark paper, for contrast


Glue shapes to inside of glass, facing outward


I find that's it's easiest to start by outlining your design, then filling in afterward. You'll feel the edges as a resistance with the tool's tip, and will be better able to stay within the lines. As you're working, you may want to wipe away the glass dust with a damp paper towel, so you can see just how much abrasion you're getting as you work. It might seem like you're done, but then when you wipe away the dust, you'll find that you have a ways to go. Always work from right above your design or template. Because of the thickness of the glass, you can get askew if your angle moves. Keep checking as you work.

Check your work by wiping away dust every now and then

Initial traced onto clear plastic, and taped to inside of glass
 When you're done engraving, you can clean up using rubbing alcohol. If the rubber cement doesn't rub out easily, you can also use a bit of WD-40 or Goo Gone to clean it up. In the end, you'll have a lovely and whimsical glass with personality!

 I hope you've enjoyed this tutorial on how to engrave glass!

Tuesday, February 8, 2011

Six-Pack Book Tutorial

If you liked the Cookie Box Tutorial, you may enjoy this one, also. After the excitement of last night's Superbowl Game, there were, of course, left over trash to be either thrown away, or recycled. I saved this one beer carrier from a six-pack of a micro brew, because I kind of liked the graphics on it, and the name cracked me up... "Raging bitch"... ha ha. I decided to make it into a book!

Start by deconstructing the box, leaving a flap
When you deconstruct the box, you should leave flaps on either side of the front cover, and on the left side of the rear cover.  (Or right side, depending on how you look at it. You want each cover to have a finished end, so if you're not sure, then put the two covers together like a book, and verify you have the outer end flaps correct.)

Folding over the spine flap
 The front cover will also have the spine flap, which you will then fold over to create the depth you want for your book. I went with a 1" spine. The remainder will be glued to the other half of the book cover. Once you create the fold, glue the two pieces together.

Glue remainder to the rear cover, taking care to keep the covers straight (level) across the top.
 Then choose a paper to cover the interior, and cut to size, going all the way under the flaps, and to the spine. I covered the spine with the piece from the back cover. It doesn't really matter, as long as the inside is all covered with a nice paper.


Use PVA glue evenly, not too thick, to adhere paper to cardboard


 Only glue the flaps after you have glued in the end pages to the covers. Then glue the flaps down onto the interior, where you already have the nice paper.
 
Glue flaps down over each end.
 After you get the paper glued inside, you need to create the jig for your stitches. This is all the same as the Cookie Box Tutorial. With the beer box, you can actually have a nice finish that you can't always have with the cookie box, or any other smaller box. You need enough extra material to flip over for the edge. If you have that with a box, it definitely makes for a nicer looking book.


This creates a nice weight, and finished look for the book.
Next, use a dab of rubber cement, or craft glue stick, to gently adhere the jig to the spine. Make your marks and with an awl, carefully punch holes through the marks. I did six signatures with six holes in each.


 After your holes are made, carefully peel off the jig, and use that to create your template for punching the holes in your signatures. Measure out your string, and thread the signatures into the spine the same as in the previous tutorial.


 When I measure for string, I always go (loosely) end to end times the number of signatures, then I add an extra six inches to that amount for knotting.


I used a butterscotch colored waxed linen thread for this book because of one of the colors in the cover. I like keeping my stitching kind of evenly spaced, but I've also done books with off-set stitching. It's totally up to you and what you feel like doing. Keep in mind that if you change the stitching locations for each signature, you will have to have a different template to punch the holes... it takes more time, but it's not difficult.

The finished spine
I used watercolor paper for this book, instead of lighter weight paper.

Having flaps makes a nicer book edge, don't you think?
 I didn't include all of the instructions, as I have those in the Cookie Box Tutorial, and it's exactly the same. The only difference is the flaps, and the fact that I added the decorative paper to the inside of the book.
Related Posts Plugin for WordPress, Blogger...